
When using old film cameras, there are usually some dust specs visible on the focusing screen or other parts.
Yet it is well known that repairing such a delicate element is dangerous since it may be executed poorly and lower the camera’s workability.
This article examines the advantages and disadvantages of cleaning the focusing screen, offers tools and means to achieve such a procedure, and evaluates the risks.
It then gives you all the information you need to decide whether cleaning your camera’s focusing screen is worth it.
Key Takeaways
- Delicate surfaces require proper care: Cleaning a focusing screen can be tricky due to its fragile material. The wrong approach can cause permanent damage.
- Use specialized tools: Tools like air blowers, microfiber cloths, and lens cleaning solutions are essential for safe cleaning.
- Risk of damage to other components: Incorrect cleaning methods can introduce dust into sensitive areas such as the mirror or sensor, complicating the issue.
- Cleaning may not always be necessary. Before proceeding, Consider whether the dust or dirt is actually affecting your camera’s performance.
- Seek professional help if needed: In cases of heavy contamination or damage, professional cleaning services are often the safer option.
What is a Focusing Screen?
The focusing screen is the part of any SLR or DSLR camera that can be said as sacrosanct.
It is contained within the camera, especially in the prism housing in most instances, and serves to assist the photographer in seeing through the viewfinder what is sharp.
It comprises a translucent sheet, which is generally of plastic or glass, and manufactured after an even distribution of light employing a Fresnel lens added on top of it to help spread the light evenly throughout the screen.
The focusing screen is well inside the camera’s body, but even so, this is very useful for focusing.
The working principle of it is simply which elements of the scene that will be in focus get displayed before the actual shot is taken.
Clear focusing screens ensure that photographers using such cameras as the Nikons, Minoltas, and Pentax have precise manual focusing, especially on the older models.
Why You Might Want to Clean the Focusing Screen

A focusing screen may gather dust, smudges, or even fingerprints if not handled properly.
It is true that dirt on the screens would not impair imaging performance, but it could create troubles when looking through the eyepiece, especially during focusing, which should be done in darkness.
You may come across small dots of dust when looking through the eyepiece or even whilst trying to fix your focus points with flotation.
But for all that it is dirty, its function does not require scrubbing out.
There may be some small specks of dust that do not adversely affect the overall shooting experience, but the weight of proclivities against using additional tools to remove these unnecessary screes makes it unwise and will now outweigh the discretion to the deserves.
Common Issues That Lead to Cleaning
- Visible dust in the viewfinder: A dust buildup may become distracting when looking through the viewfinder.
- Smudges or fingerprints: These are common if the screen has been touched accidentally.
- Excessive dust after long storage periods: Cameras stored in dusty environments may develop enough buildup to impair viewfinder clarity.
Risks Involved in Cleaning a Focusing Screen
1- Scratches and Permanent Damage
The greatest hazards in cleaning a focusing screen are Merritt, such as scratches.
The majority of focus screens consist of soft resin and glass, which, to a certain extent, even careful wiping with a moderately abrasive cloth can inflict scratches on them.
Such scratches cannot be fixed and will remain forever, impeding your view when looking through the viewfinder.
Common Causes of Scratching During Cleaning
| Cause | Risk Level | How to Avoid |
|---|---|---|
| Using rough cloths or tissues | High | Use only microfiber cloths |
| Applying excessive pressure | High | Use a light touch when cleaning |
| Touching the screen directly | Very High | Avoid touching the screen with your hands or tools |
| Using abrasive cleaning agents | High | Use camera-specific cleaning solutions |
2- Introducing More Dust or Debris
Failure to clean the camera adequately may result in the transport of more dust within or the pushing of dust particles deep into the crevices and corners of the intricate parts inside the camera.
In fact, tools such as compressed air are effective in removing dust. Still, they displace the dust deeper into the camera body, thereby worsening the condition of other features such as the mirror, prism, or sensor.
3- Risk of Damaging Other Components
Turning the focusing screen during cleaning may involve an unsettling risk of scraping the other sensitive components of the camera, including the mirror and the sensor, apart from the focusing screen.
This catastrophe occurs more often among SLR cameras and even more so with DSLR cameras since a focusing screen is usually sandwiched between the other components.
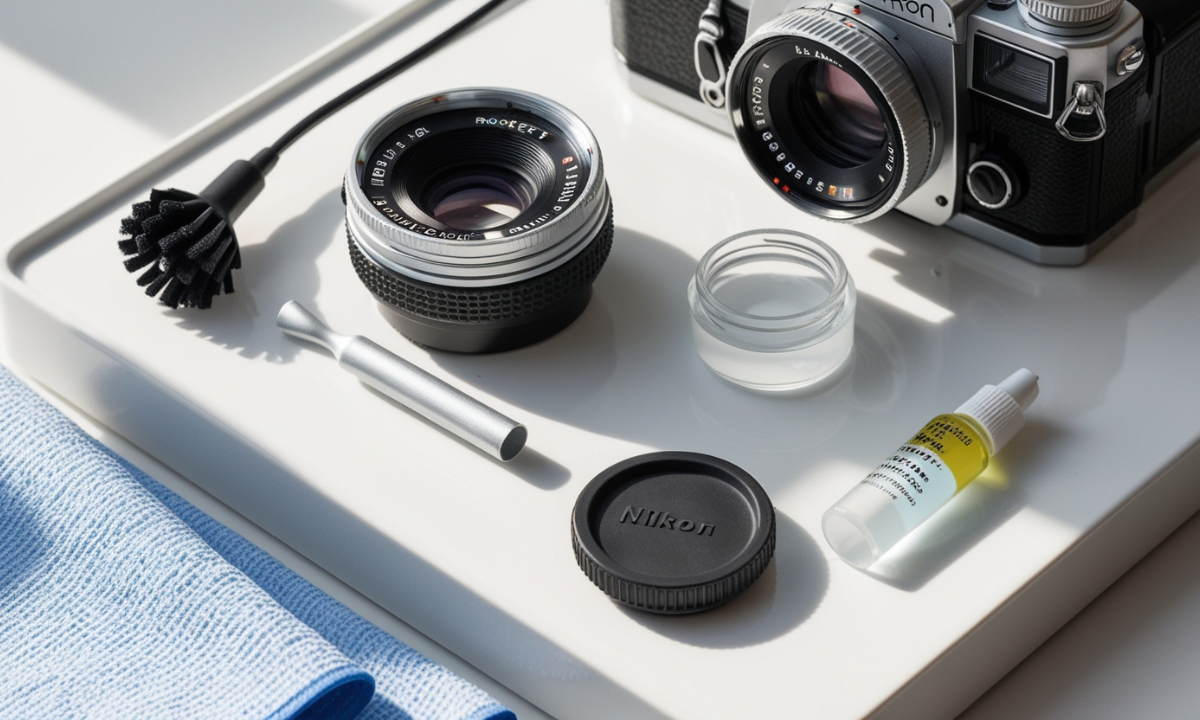
Tools and Methods for Safe Cleaning
Essential Tools
- Rocket Blower: Of all the tools available for the removal of dust, the most effective and most commonly suggested is a handheld air blower called the Rocket Blower, which can blow dust off the surface without a need to come in contact with the surface. There is a special portable apparatus that removes surface dust.
- Microfiber Cloth: If screen cleaning is inevitable, a microfiber cloth should be used, as it is soft and does not scratch.
- Lens Cleaning Solution: To remove smudges or fingerprints, a fine spray lens cleaning solution is useful. It can be applied to a microfiber cloth to clean the screen without damaging it.
- Distilled Water: The use of very hot water is best advised in rare cases where the only complainants are very gentle solutions on a microfiber cloth when cleansing for distilled water.
- Cotton Buds or Q-Tips: In specific areas, a wet Q-tip is used to clean the edges where the exposure of the liquid is minimal.
Cleaning Methods
1- Air Blowing to Remove Dust
The first and safest step is to remove any loose dust from the camera screen with the help of a rocket blower.
At first, let the body of the camera resting on your palm and the screen facing downward.
Compressed air should not be used as it goes out at high pressure, which may tend to shove some dust into the deeper parts of the camera body or even get some residue out of it.
2- Gentle Wiping with a Microfiber Cloth
Such leaves outstanding dirt and congestion where much dust is present or smudges are constituted, therefore a fine cloth can be used to lightly scrub the last cover focusing screen surface bead or cloth.
Do not rub off with too much pressure, as that can cause scratches to the surface.
3- Applying a Cleaning Solution
A little amount of liquid might even be ideal but in this case, a bit of lens cleaning solution will do quite well.
However, it is recommended that one always dampen the cloth rather than directly apply the solution onto the screen.
Take care that the cleansing solution applied does not rub against another part of the camera.
Precautions to Take

1- Avoid Touching the Screen Directly
Protecting the screen from contact with one’s hands is vitally important since it is very easy to have either oils or fingerprint smudges, which can prove difficult to clear off such a screen.
Proper equipment such as air blowers and clean microfiber clothes should always be there for cleanliness reasons.
2- Don’t Use Compressed Air
Compressed air is unnecessary because it is usually so powerful that it can drive dirt deeper into the camera and harm delicate internal parts, such as the mirror or the sensor.
Use hand air blowers instead.
3- Be Careful Around the Mirror and Sensor
Cleaning the focusing screen will necessitate possibly disassembling the camera body. This exposes the mirror and screen to dust and damage. Clean up as previously suggested.
Should You Remove the Focusing Screen?
In some cases, there are cameras – often older ones like some of the Nikon or Pentax SLRs – that allow you to take out the focusing screen for cleaning.
If you choose to do this, please handle the screen with special care.
With the screen being ejected, cleaning it properly becomes much easier, but the opportunity to break the screen increases too. For most users, the safer alternative is to leave the screen on and use a rocket blower or a microfiber cloth.
When to Remove the Focusing Screen
| Camera Model | Removable Screen | Tools Needed | Risk Level |
|---|---|---|---|
| Nikon F3 | Yes | Screen removal tool, microfiber cloth | Medium |
| Pentax LX | Yes | Rocket blower, microfiber cloth | Medium |
| Minolta SRT 101 | No | Rocket blower, microfiber cloth | Low |
| Nikon FE2 | Yes | Screen removal tool, cleaning solution | Medium |
When Professional Help is Necessary
In some cases, it is not recommended to try and make dirt with unnecessary efforts being focused on the relief screen cleaning.
Sometimes, bringing the focusing screen in a quite horrid condition or with noticeable scratches, which must affect the proper use of the screen itself, is a good reason to seek help.
Repairs of cameras come with proper tools and knowledge that people use to remove or repair damaged screens free of any harm.
Proper Maintenance to Minimize Cleaning Needs
When it comes to the cleaning of the focusing screen’s surface, the old saying that ‘an ounce of prevention is worth a pound of cure’ applies well.
Some simple steps could make it possible to reduce how much dust and dirt gets into the interior of the camera:
- Store your camera properly: Do not expose it to dusty conditions, and always store it in a plastic bag or other container when not in use.
- Keep the lens and body caps on When changing modes, do so as fast as possible and in clean environments to prevent dust from getting to the body.
- Regularly clean the lens and exterior: Cleaning the lens will also minimize dust getting into the inner case of the camera.
The Importance of Using the Right Products
Using cleaning supplies found at home or making do-it-yourself solutions could be quite simple. Nevertheless, it is quite irrefutable that such practices cause danger to some camera elements.
Wipe the camera only with the clothes made for cameras. Only use rectified alcohol, alcohol-based cleaners made for this purpose, or microfiber buffing cloths.
Enamel thinners or detergent may smear surfaces, and reactive chemicals may dissolve any fragile parts of the camera.
Alternatives to DIY Cleaning
If you wish to clean your focusing screen, but I am positive that you find tasks very uncomfortable, you do not need to be this way.
There are people, notably many camera stores, who will happily clean one’s camera for a reasonable charge.
There are also some photographers who have successfully engaged in taking apart their Cameras D SLR and cleaning them in dust-free clean rooms.
Camera Cleaning Service Costs by Region
| Region | Average Price for Professional Cleaning | Estimated Turnaround Time |
|---|---|---|
| North America | $50 – $150 | 3 – 7 days |
| Europe | €40 – €120 | 5 – 10 days |
| Asia | $30 – $100 | 2 – 5 days |
What Is a Fresnel Lens and Why It’s Important for Focusing Screens?
A Fresnel lens is a thin optical lens that was invented in the 19th century for use in lighthouses to maximize the collection and redirection of light. In modern cameras with built-in or detachable viewfinders such as SLR (Single-Lens Reflex) or DSLR (Digital Single-Lens Reflex), Fresnel lenses are fitted into the focusing screen for the better even distribution of light within the viewfinder area.
This provides a bright view through the viewfinder, thereby facilitating precise manual focus.
Owing to the unique optical design of the Fresnel lens, it has proven easy to make a thin lens that has the optical performance of a thicker lens.
To the owners of film cameras, mainly the older Nikon or Minolta models, this lens has become very important because it provides clear and crisp pictures within the viewfinder.
In case you aim to clean your focusing screen, be sure to know that the Focus Fields Fresnel lens should also be protected because its scratches or damages will handicap the efficacy of the viewfinder.
How to Identify If Your Focusing Screen Needs Cleaning?
First of all, the most important step is to ask yourself the question: Do I need to clean my focusing screen? It would be prudent to note how very few circumstances would warrant a clean-up of your focusing screen. Examples of situations that will require such screens to be cleaned are:
- Obstructed view through the viewfinder: If you see substantial dust and dirt on the image when framing your shot, it is a clear sign that the focusing screen requires replacement.
- Visible smudges or fingerprints: If the oil on the P screens was touched or used carelessly, oil spots would appear, blocking the area, making it impossible to focus.
- Decreased brightness in the viewfinder: Due to prolonged use, a layer of dust and dirt settles in and decreases the amount of light you see through the eyepiece.
- Difficulty in focusing manually: If the manual focus action becomes more difficult to do, particularly if there is a decrease in light, it could be due to a dirty or grimy focusing screen.
- Checking under good light: To give an accurate diagnosis of the focusing screen’s condition, one should look through the viewer in normal lighting conditions. The viewer may also be used to examine the rather small particles or smudges.
My Opinion
It has been found that cleaning the focusing screen of the film camera will have a positive effect on the shooting, but this may be harmful.
Think first whether the dust really prevents you from getting good photographs or if the benefits of undertaking the action outweigh the drawbacks.
Clean properly and diligently – utilizing the appropriate tools: air blowers, microfibers, and cleaning chemicals. When in doubt, do not do it.
Professional cleaning is recommended. If done properly, there shouldn’t be a need for cleanings that are so frequent.